10 Tips for Choosing the Best LED Screen

Choosing the best LED screen starts with the place where people will see it. A display above a shop entrance faces different demands from one inside a conference room. Distance matters. So do sunlight, viewing angles, and the hours the screen will run each day. Details matter.

LED researcher E. Fred Schubert’s work on light-emitting devices offers a useful engineering perspective. A practical buyer-facing paraphrase—not a verbatim quotation—is: “Match the light source to the job, not just the specification sheet.” That distinction can prevent costly mismatches. A fine pixel pitch may look sharp up close, yet add expense where viewers stand far away. Excessive brightness can also waste power and make indoor content uncomfortable to watch.

This guide explores ten practical checks, including pixel pitch, brightness, resolution, refresh rate, cabinet design, control systems, installation, service access, warranty, and total ownership cost. Look closely at the details: the glare on a sample panel, the weight of a cabinet, or how quickly a technician can reach a power supply. Ask vendors for specifications and proof of performance in conditions similar to your own. A polished demo is useful, but it does not answer every question. Some choices still involve trade-offs. The aim is not to find a flawless screen; it is to choose one that performs reliably for its audience, setting, and budget.

10 Tips for Choosing the Best LED Screen

Define the Screen’s Purpose, Location, and Installation Requirements

Choose the screen’s purpose before comparing pixel pitch or brightness. A retail display beside a sunlit window needs different output from a meeting-room screen. For outdoor advertising, OAAA’s 2023 OOH Revenue Report found digital formats generated roughly one-third of U.S. out-of-home advertising revenue. That signals demand, not guaranteed returns. Define what viewers should notice, how far away they will stand, and how long content will run.

Tip: Visit the site at the time people will use the screen. Check direct sun, reflections, viewing angles, ambient noise, and available power. Measure the actual viewing distance; a screen that looks crisp in a showroom may appear coarse across a wide lobby. For installation, confirm wall strength, ventilation, cable routes, service access, and protection from rain or dust. A lift or road closure can change the project cost quickly.

Write down those constraints before requesting proposals. Include indoor or outdoor conditions, operating hours, content type, and mounting height. Ask installers to explain brightness and pixel-pitch choices in relation to your site, not just quote specifications. Leave room for maintenance access. It is easy to overlook. OAAA’s figures describe advertising revenue, so they cannot predict performance for every venue; treat them as context, then validate the plan with an on-site assessment.

10 Tips for Choosing the Best LED Screen - Define the Screen’s Purpose, Location, and Installation Requirements

Tip Purpose and Location What to Evaluate Practical Guidance
1. Define the screen’s main purpose Retail promotion, presentations, public information, entertainment, or wayfinding Content type, operating hours, audience, and required level of detail Text-heavy content needs finer pixel pitch than simple, bold graphics viewed from farther away.
2. Measure the viewing distance Close viewing in meeting rooms or shops versus long-distance viewing in plazas or arenas Nearest and typical audience positions As a rough starting point, a 1 mm pixel pitch may suit viewing from about 1 m or farther; actual readability also depends on content and eyesight.
3. Match pixel pitch to the audience Indoor spaces often have closer viewers; outdoor displays are commonly viewed from farther away Pixel pitch, viewing distance, and the smallest text or details displayed A smaller pitch provides more detail at close range, but usually increases display cost and processing requirements.
4. Check ambient light and brightness Shaded indoor areas, bright windows, covered outdoor sites, or direct sunlight Ambient light throughout the day, reflections, and brightness control Indoor displays often use hundreds to around 1,500 nits; outdoor displays exposed to sunlight may require several thousand nits. Select for site conditions and provide automatic or manual dimming where appropriate.
5. Confirm indoor or outdoor conditions Climate-controlled interiors, exposed façades, or semi-protected installations Rain, dust, temperature range, humidity, and ventilation For exposed locations, check the complete system’s ingress-protection rating and operating-temperature limits; an IP rating alone does not confirm suitability for every weather condition.
6. Choose the screen size and aspect ratio Available wall, storefront, stage, or freestanding structure Viewing area, mounting limits, content format, and sightlines Measure the usable installation area and plan content dimensions before selecting a screen; avoid obstructing exits, signs, or accessible routes.
7. Plan the mounting structure Wall-mounted, suspended, ground-supported, or integrated into a stage Screen weight, structural capacity, wind exposure, access, and local building requirements Have a qualified professional assess the supporting structure and anchoring, particularly for large, elevated, or outdoor displays.
8. Verify power and signal routes New or existing electrical and data infrastructure at the site Electrical supply, expected load, cable distance, network access, and backup needs Confirm power and data requirements with the installer before construction; use appropriately rated circuits and weather-protected connections outdoors.
9. Plan for service and maintenance Sites with limited access, high mounting positions, or continuous operation Front or rear access, replacement parts, cleaning, and safe working access Choose a service approach that suits the site and include safe access provisions in the installation plan.
10. Review operating needs and total cost Occasional events, daily business hours, or near-continuous operation Energy use, control system, content updates, warranty, and maintenance access Compare the full lifecycle requirements, not just the initial display cost, and make sure the planned operating schedule matches the equipment specifications.

Guidance is indicative; final specifications should be confirmed against site measurements, local regulations, and the display manufacturer’s technical documentation.

Compare LED Screen Types and Select the Appropriate Pixel Pitch
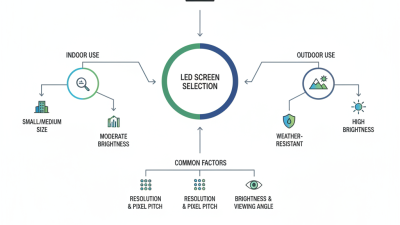
LED screen types suit different viewing conditions. Indoor screens usually use smaller pixels, which keep text and faces sharp at close range. Outdoor screens need higher brightness and weather-resistant cabinets; their pixels can often be larger because viewers stand farther away. Rental panels are built for repeated setup, while fixed-installation screens may prioritize access for maintenance. Look closely at the setting. A bright lobby and a shaded meeting room need different displays.

Pixel pitch is the distance, in millimeters, between neighboring pixels. A smaller pitch usually produces a finer image, but it costs more and may offer little benefit from across a large hall. Estimate the typical viewing distance, then check sample content at that distance: tiny text, a moving video, and a person’s face. Don’t judge from a showroom wall viewed from two feet away. That can mislead. As a rough guide, closer audiences often need finer pitch, but room layout and content matter too. Measure the nearest seat, not just the back row. A simple rule can help, but it is not exact; I would leave room to question the first calculation.

Assess Brightness, Resolution, and Viewing Distance

Brightness should match the light around the screen, not just look impressive on a specification sheet. In a dim meeting room, excessive brightness can make white backgrounds uncomfortable. Near a sunlit window, a screen that looks vivid indoors may appear washed out. Check the manufacturer’s typical operating brightness, not only its maximum, and ask whether brightness can be adjusted smoothly. Small differences matter.

Resolution needs to suit both the content and the viewing distance. A fine-pitch display can show small text clearly, but it may cost more than a space requires. For example, viewers standing close to a control room screen will notice pixel structure that people across a lobby may not. Measure the usual distance, then compare it with the screen’s pixel pitch and a sample image. Stand where visitors will stand. Look at text, faces, and thin lines, not just colorful video. A quick showroom glance can mislead.

Finally, test the screen at the actual site if possible. Light changes during the day, and viewing angles may shift as people move through the space. A simple brightness reading and a tape measure help, but neither captures every real-world condition. I’d leave room to revise the choice; planned viewing distance is not always actual viewing distance.

Review Connectivity, Control Systems, and Device Compatibility

A sharp LED image depends on the whole signal chain, not just the panel. Check input types, resolution, refresh rate, and color format across every source device. A laptop may output a different timing than a media player, leaving a black screen or cropped image. AVIXA’s 2024 Industry Outlook and Trends Analysis forecast professional audiovisual revenue reaching $402 billion by 2029. As systems grow more connected, compatibility deserves attention during equipment selection, not only installation.

Ask whether the screen processor can map your content layout without awkward scaling. Confirm that control software supports the required network protocols, scheduling, and monitoring functions. Test the actual devices, cables, and switching path before purchase. I still find this easy to overlook: a system can pass a laptop test, then fail with the venue’s media player. Check device handshakes, especially EDID settings, and document a known-good configuration. Keep spare cables nearby. Small details matter. For network control, review port requirements and security settings with your IT team; do not assume a standard connector guarantees reliable operation. A short compatibility test can expose timing, audio, or control conflicts before they reach the wall.

Compare Durability, Support, Warranty, and Total Ownership Costs

When comparing LED screens, inspect more than the cabinet’s finish. Check pixel consistency, connector strain relief, cooling paths, and whether modules can be replaced from the front. Ask for written brightness and color-uniformity tolerances, plus parts availability after installation. A low purchase price can become expensive when a failed module requires specialist labor or long shipping delays.

Separate component test data from whole-screen promises. The U.S. Department of Energy’s LED lifetime guidance uses LM-80 measurements, commonly taken over at least 6,000 hours, to assess light-source maintenance; this does not guarantee the life of a complete display. Request the actual test reports and clarify exclusions, labor coverage, and response times. Small print matters. For ownership costs, estimate electricity, maintenance visits, spare modules, and downtime across the planned service period. The U.S. Energy Information Administration reported an average commercial electricity price of 12.75 cents per kilowatt-hour in 2023. At that rate, a 1-kilowatt screen running 12 hours daily costs about $558 annually in electricity alone. Your local tariff may differ. I would still treat any lifecycle estimate as a forecast, not a promise; operating hours and repair access are easy to underestimate.

Need Help?
X

Ready to Talk?

Our team is ready to connect.